
Jump Desktop is one of the more common remote access tools that I see in post facilities these days. It is light weight in both application resources and bandwidth requirements and it is also budget friendly.
One of the drawbacks, however, is that support for non-standard resolutions can be a bit finicky out of the box, especially if the remote bays are iMacs or iMac Pros or have a dual monitor setup. Users who have ultrawide monitors (21:9 aspect ratio), may see pillar or letterboxing as Jump attempts to negotiate the resolution differences between the remote system and home system.
There are a couple of options to help combat the resolution disparities. The facility could install dummy display emulators on the bays, such as the DTECH HDMI 4K Display Emulator, but if your environment is hybrid and you have shared systems with users both in the office and remote, your users in the office will not be able to access these systems directly. These adapters also do not support all resolutions, and many do not support the 21:9 aspect ratios.
Enter SwitchResX. SwitchResX is an applicaiton for Macs that allows for custom monitor resolutions and pairs nicely with Jump Desktop.
NOTE: For remote bays running MacOS El Capitan 10.11 to Catalina 10.15.1, SwitchResX requires the temporary disabling of the System Integrity Protection to add or modify a custom screen resolution. This could be a security concern for some users. For more information, please see SwitchResX’s FAQ.
Bays running Catalina 10.15.2 or later do not need to disable System Integrity Protection for custom resolutions. Our example will use a bay running Big Sur 11.5.2.
Configuring SwitchResX for Ultrawide Monitor Support
You can download a trial copy of SwitchResX from their website at www.madrau.com.
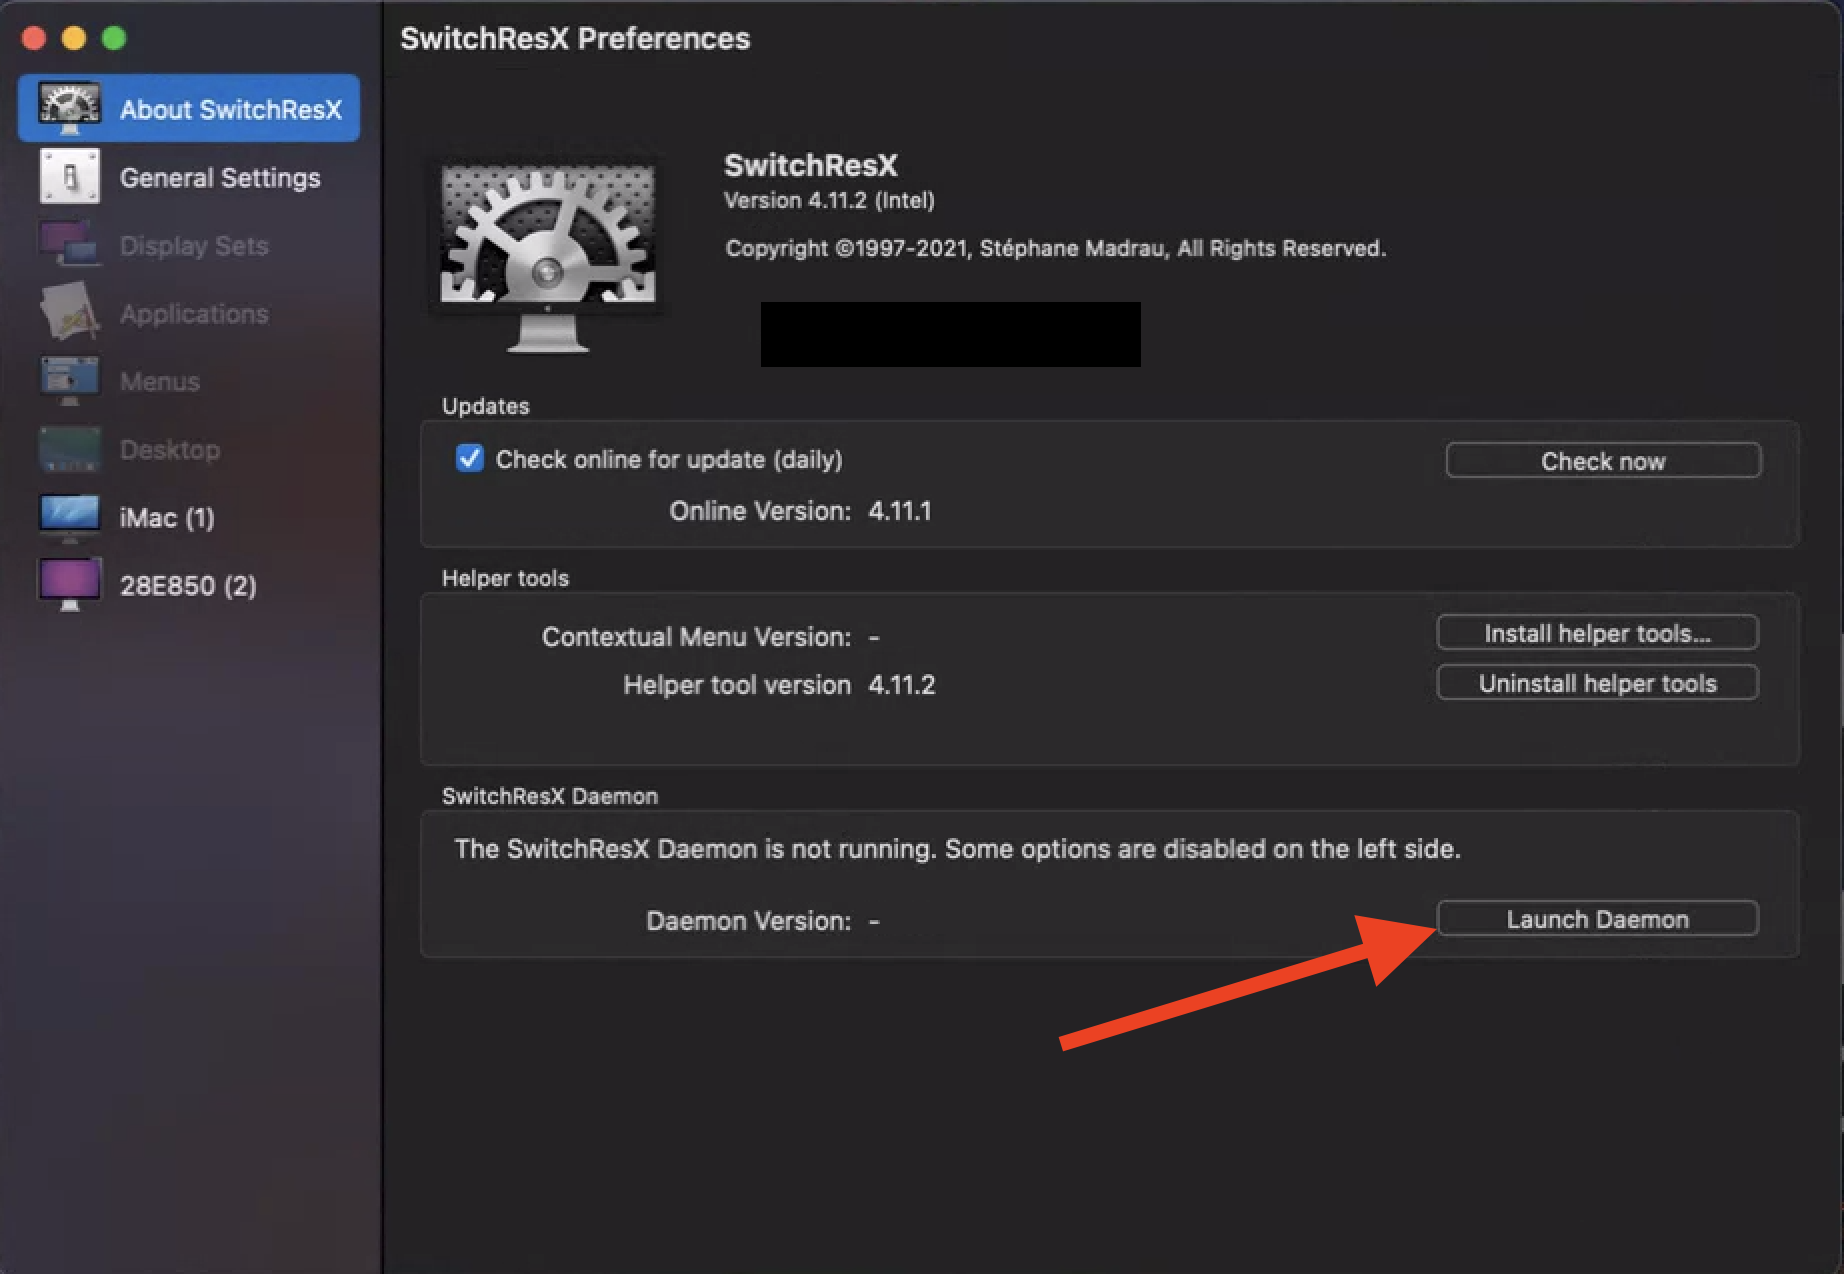
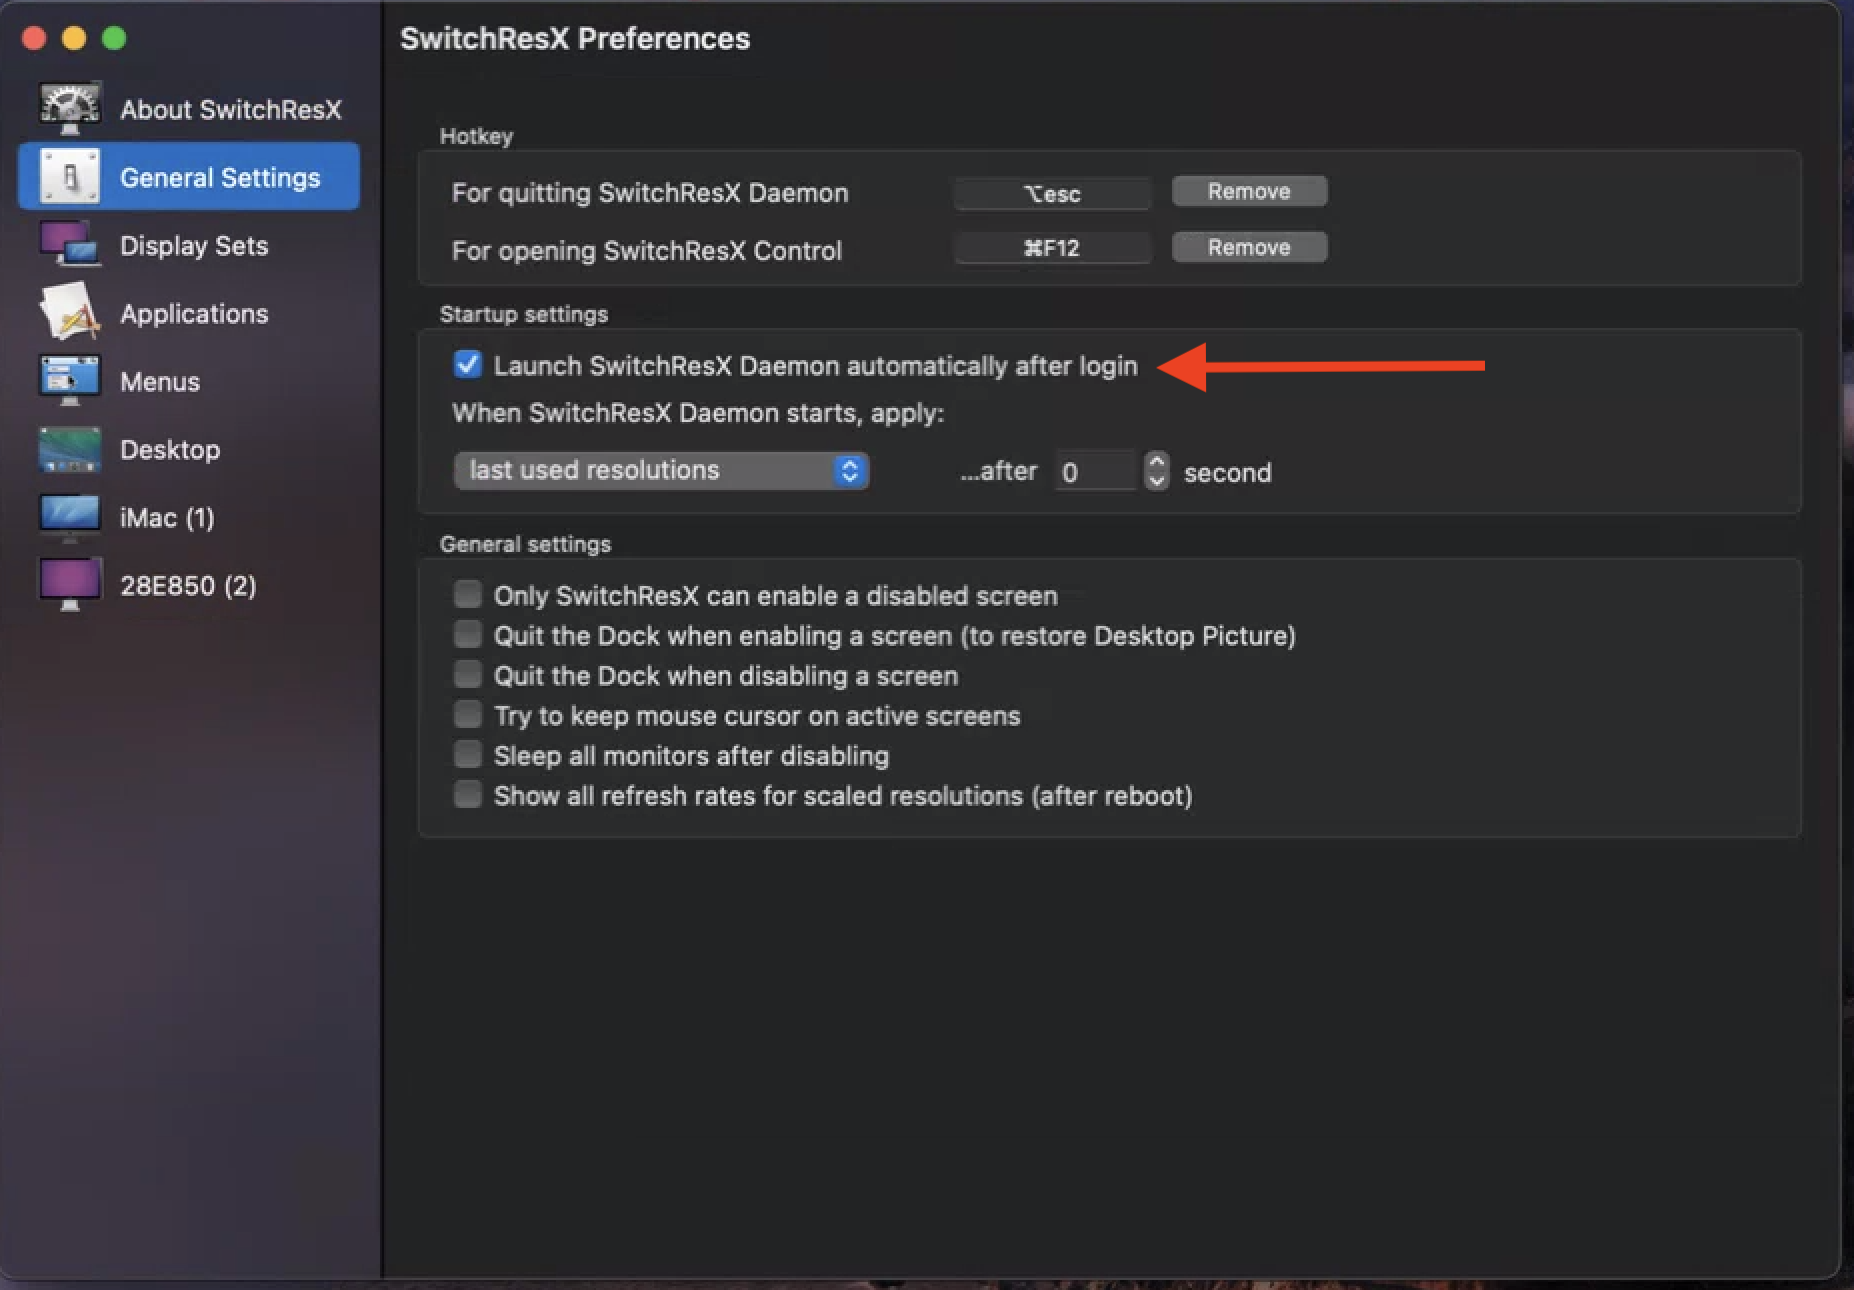
Once SwitchResX is installed, you will want to enable the Daemon in the About SwitchResX preference and set it to launch at login in the General Settings preference.
With the Daemon active, you will gain access to a few additional settings options: Display Sets, Applications, Menus, and Desktop. For our needs, we will focus on Display Sets and then each physical display listed at the bottom of the column.
One thing to keep in mind is that iMacs and iMac Pros will not display custom resolutions in Apple’s Displays system preference. If the iMac display is the only display on the remote bay (and you’re not using an additional display emulator), you will need to change to the custom resolutions using SwitchResX’s preferences or menu bar menu.
Adding the custom resolutions to the display
The standard resolutions for most ultrawide monitors are either 2560x1080p or 3440x1440p.
To add these resolutions so that they are usable for your display:
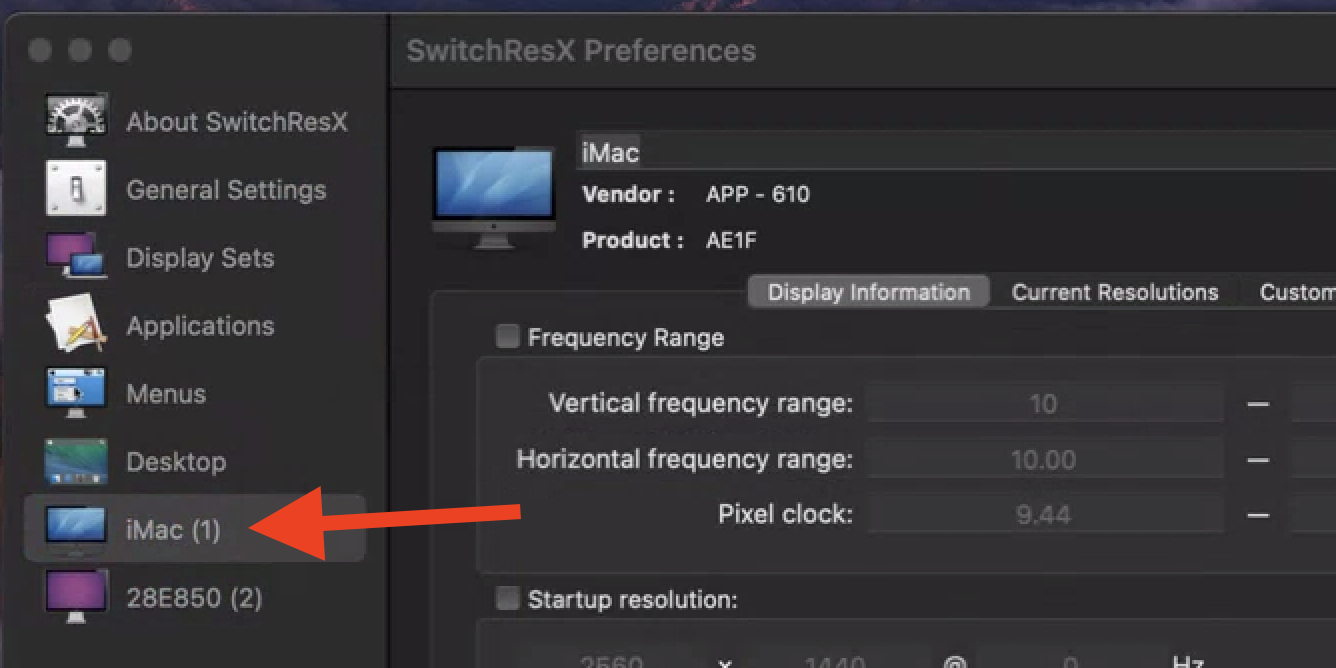
- Select the display will be have the custom resolutions in the left column.
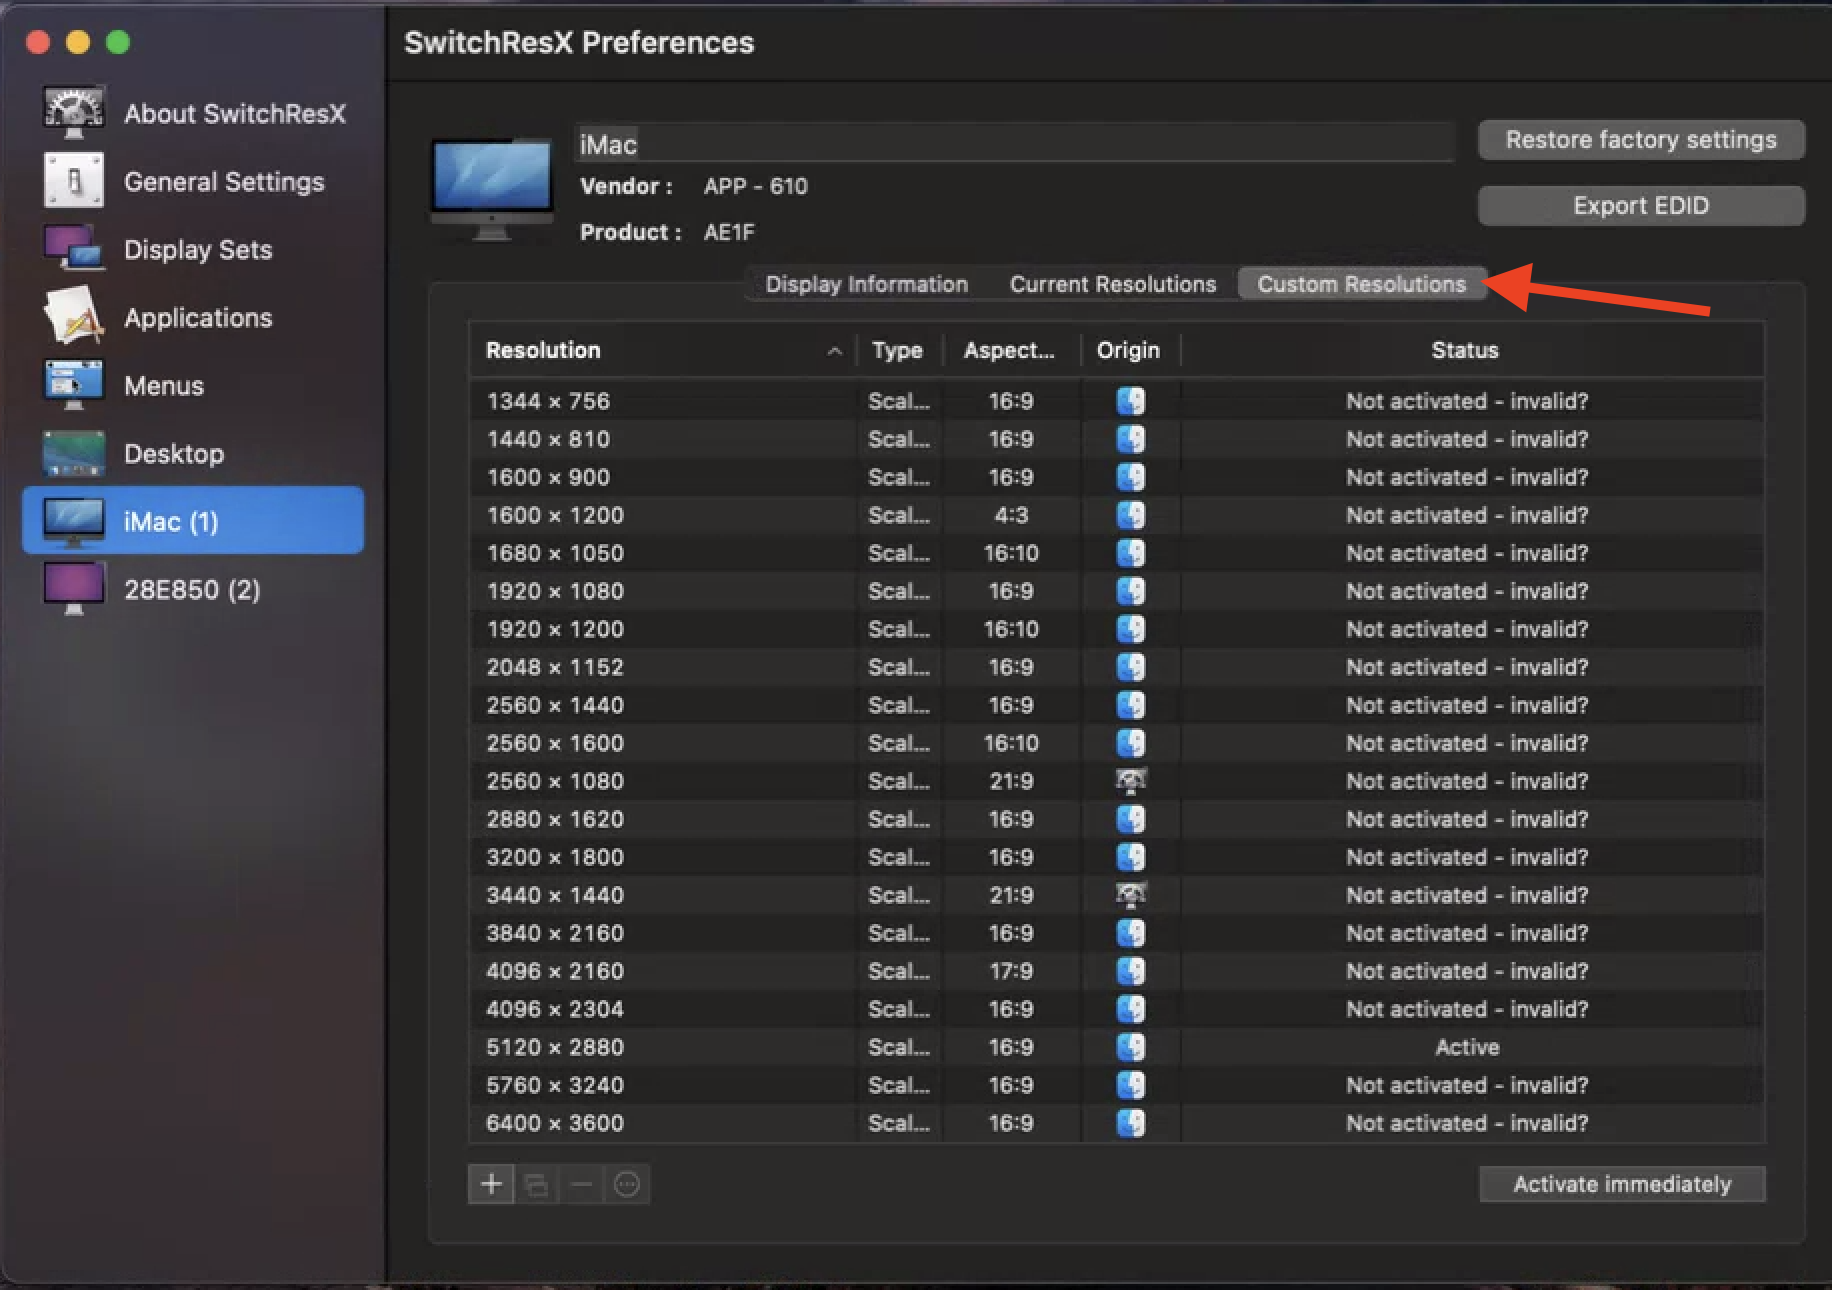
- Navigate to the Custom Resolutions tab. If you are on an iMac, you may see a long list of resolutions that have a status of “Not Activated – invalid?”. No need to worry about them. If you are not using an iMac, your Custom Resolutions tab may be empty.
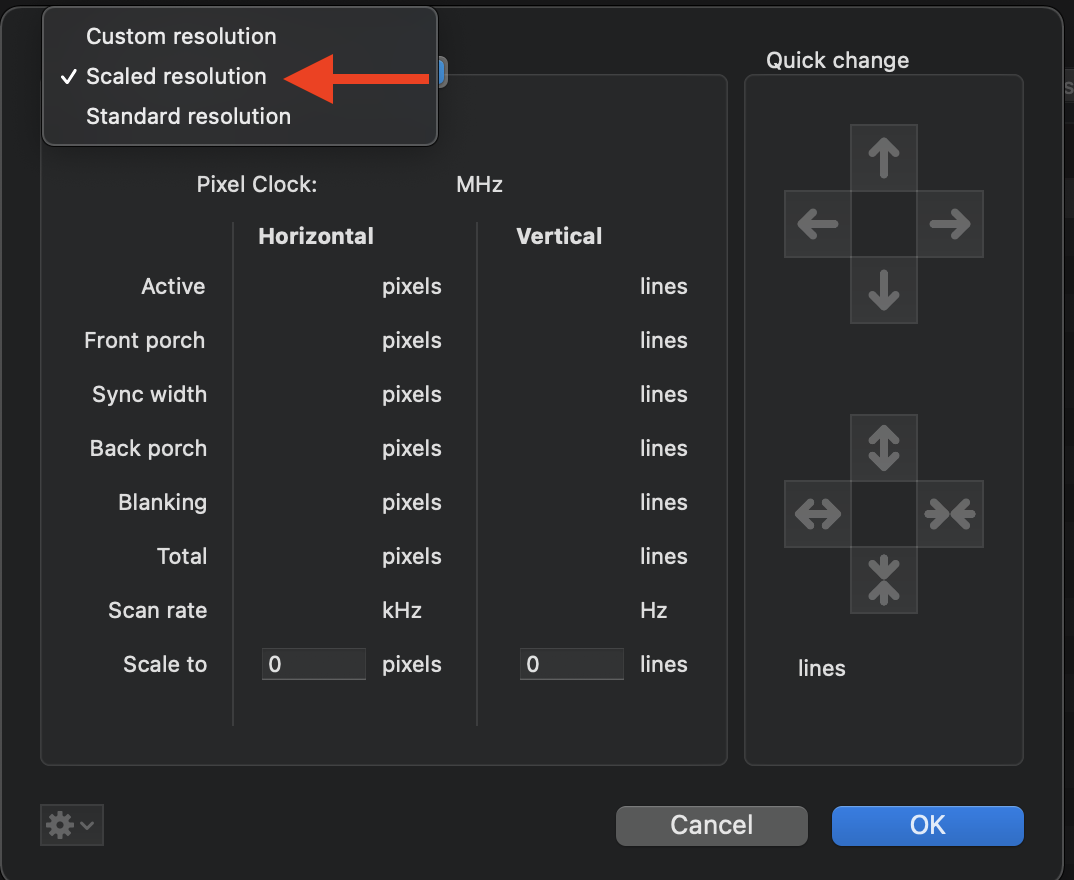
- Click the + button at the bottom left of the window to add a custom resolution to the display. This screen may be a little intimidating for first time users, but there are only a few values that need to be updated. In the custom resolution setting, users have the option to create a brand new “custom” resolution or set “scaled” resolutions. In my experience both on iMac based systems and third party monitors, using “scaled” resolutions was the most successful. Click the drop down menu and select Scaled Resolution.
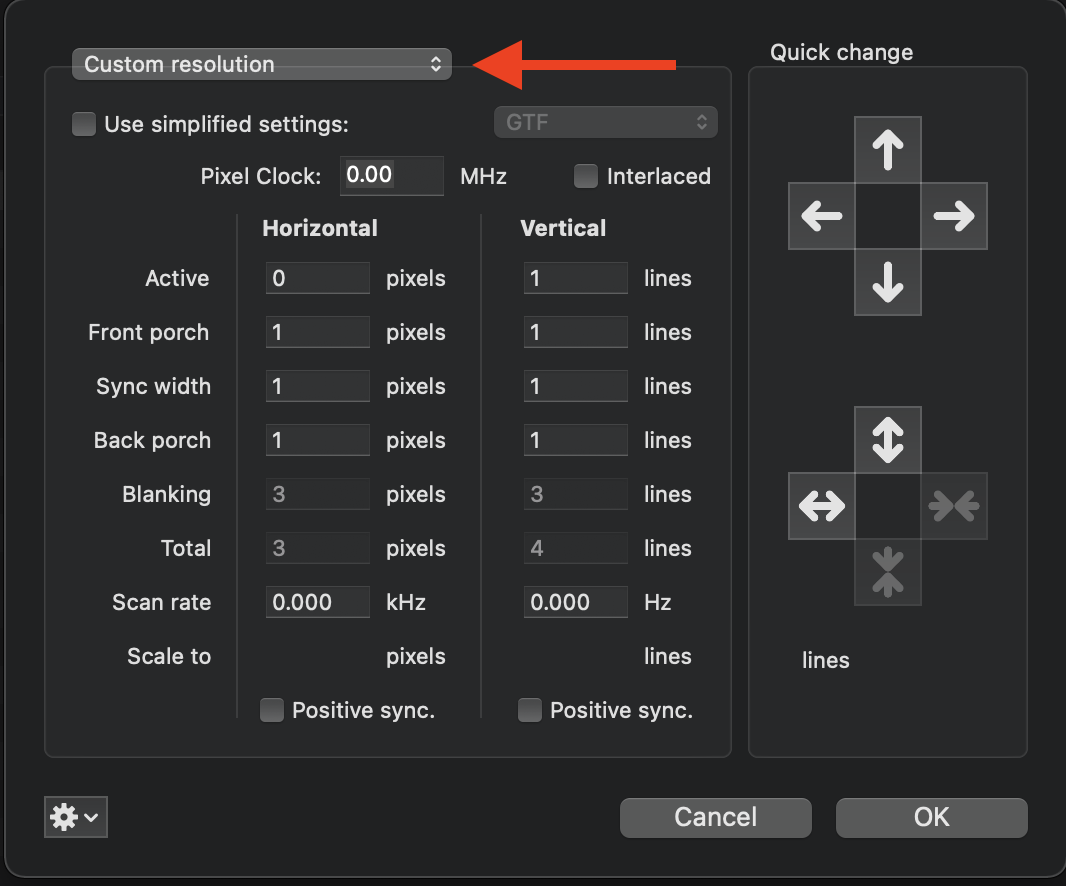
- In the Scaled Resolution settings, you will only be able to modify the horizontal and vertical pixel count, and you won’t have to worry about “porches”, “blanking” or “scan rate”. As mentioned above, the standard resolutions for ultrawide monitors are 3440×1440 and 2560×1080. The first number is the horizontal pixel count, and the second is the vertical pixel count. Go ahead and enter one resolution set and click OK.
- Repeat steps 3 & 4 for any additional custom or scaled resolutions you need to set.
Once you are done adding the custom resolutions to the display, you may see a status message that says “Needs to reboot”.

- Go ahead and restart your Mac so that the resolutions can be used.
Using an Ultrawide Monitor With a Remote Bay With a Single Monitor
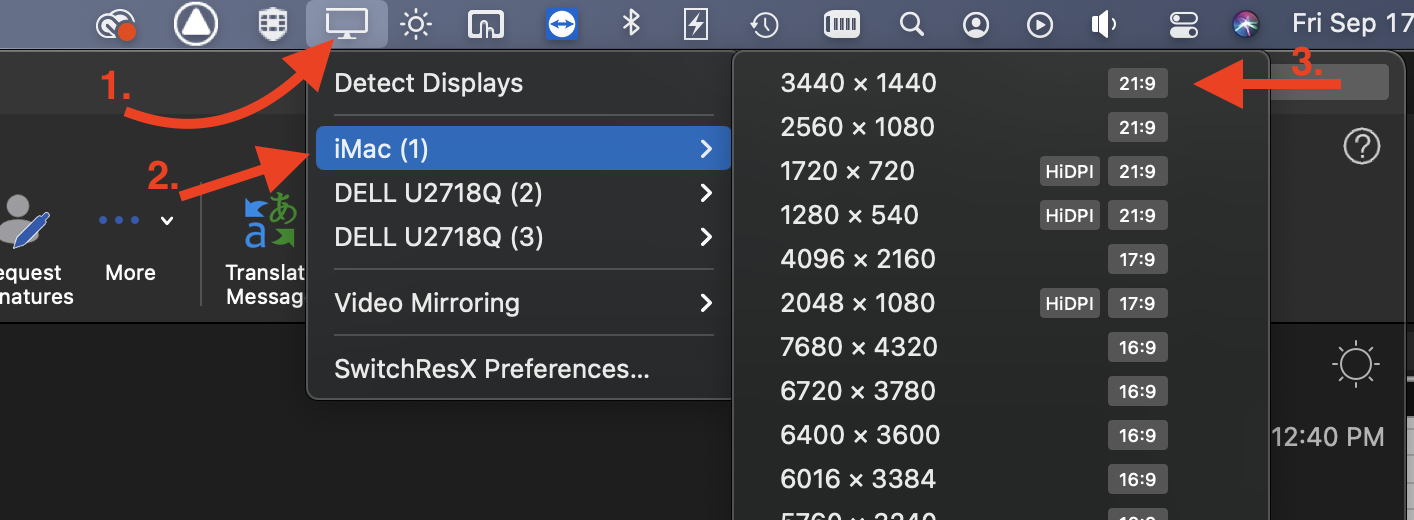
If your remote bay only has a single monitor attached to it, or it is an iMac, the easiest way to swap to the ultrawide resolution is to use the SwitchResX Menu Bar Icon. After you click on the icon, a menu will pop up and you can select your monitor and then the ultrawide resolution.
To swap back to your normal display resolution on the remote bay, repeat the process but select the native resolution of the connected monitor such as 2560×1440 or 1920×1080.
Using an Ultrawide Monitor with a Remote Bay with Two or More Monitors
There are a couple of ways to handle using an ultrawide monitor with remote bays that have multiple local displays (or display emulators), but I have found the best way is Display Sets.
Display Sets are monitor presets or “favorites” that can enable/disable screens or display mirroring, and preset screen resolutions. Setting up a Display Set for each use case puts them right in the SwitchResX Menu in the menu bar for quick and easy switching.
Configuring a Default Display Set
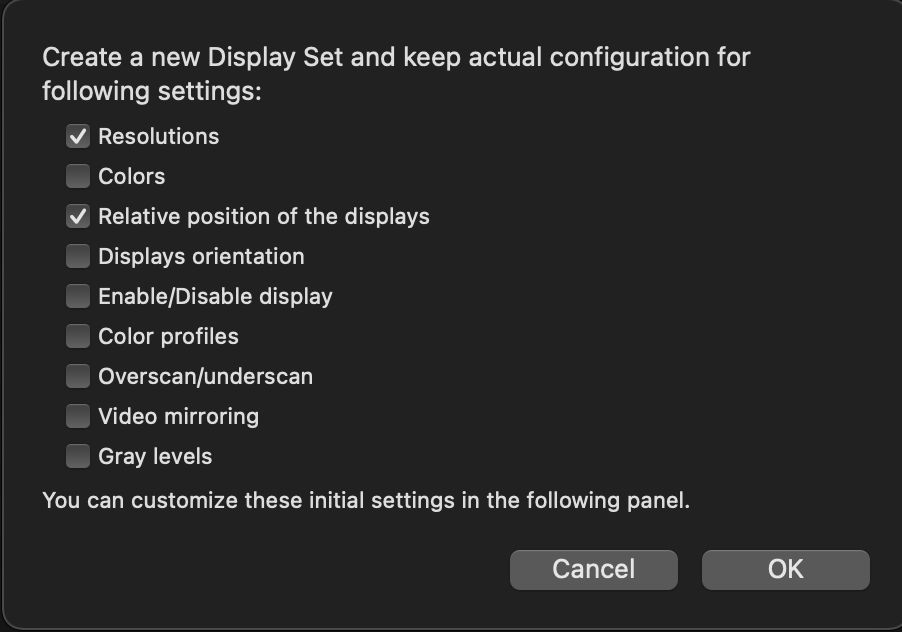
- Open the SwitchResX Preferences and navigate to Display Sets on the left. Click the + button in the bottom left to create a new display set. You will be asked if you want to start with the current settings and you can check or uncheck as needed. I usually keep the current resolutions and relative position of the displays as a starting point.
- In the window that appears, first name your display set. This name is what will appear in the menu bar menu. I am going to start by creating a default, multiple display Display Set that I can use to return to.
- In the bottom half of this window you will have options to configure each display as well as a preview of their current layout. We will focus on the drop down menu in the middle to select the screen we wish to adjust, and the Resolution drop down menu just below.

- If you chose to keep the current resolutions and placement in step 1, our default Display Set should be ready to go. Resolution should be set to the primary resolution of the remote bay (for iMacs 2560×1440 HiDPI 16:9, possibly 1920×1080 for other displays). All displays should be enabled. Video mirroring should be unchecked, and there should be no adjustments to any of the other settings in the window. Click OK to save this initial “default” Display Set.
Configuring Ultrawide Display Set
- In the Display Sets section of the SwitchResX Preferences, click the + button in the bottom left to create a new display set. You will be asked if you want to start with the current settings and you can check or uncheck as needed.
- Name your display set. I like to use “Ultrawide” with the resolution. ie “Ultrawide (1440p).
NOTE: There are a few options to force the remote bay with multiple displays to act as if it only has a single ultrawide monitor attached: disable one of the displays or enable display mirroring.
In my testing I have found that Avid can become unstable when disabling or enabling a monitor when the host system is an iMac, so I recommend using the display mirroring function.
- Enable the Video Mirroring checkbox, and make sure to select one of the displays as the “Primary Display”. Also make sure to set the resolution to your preferred ultrawide resolution.

- Click OK and close out of the SwitchResX preferences.
- You can now access your display sets from the SwitchResX Menu Bar menu to easily switch back and forth.

And there you have it. A quick and cost effective way to support your remote editors who have ultrawide monitors at home.
If you have any questions or comments, feel free to reach out to me at @nerdypuppro on Twitter.