
Disclaimer: This method of downgrading the operating system on a T2 equipped Mac is not officially supported by Apple. While I do not believe it will permanently cause any damage, it is possible that data may be erased. Proceed at your own risk.
Recent versions of Avid Media Composer have had problems when running on MacOS Mojave 10.14.3 or 10.14.4. This is a big issue should you choose to purchase a new Mac, specifically one with a T2 Chip in it, as as Apple states that they operating systems cannot be downgraded. I decided to test this out with a recently purchased iMac Pro that a client was looking to use in their Avid Media Composer workflow.
For this experiment, I decided to leave Mojave installed on the primary APFS Container Volume, and use Disk Utility to add a second APFS Container Volume called HighSierraTest. Apple has a Disk Utility User Guide available, but you can see the excerpt below to setup an additional APFS Container Volume.
- In Disk Utility on your Mac, choose View > Show All Devices.
- Select an existing APFS volume in the sidebar, then click the Add Volume button .
- Enter a name for the new APFS volume. In this case I used HighSierraTest.
- Click the Format pop-up menu, then choose a file system format.
- If you want to manually manage APFS volume allocation, click Size Options and enter values in the fields:
- Reserve Size: The optional reserve size ensures that the amount of storage will remain available for this volume.
- Quota Size: The optional quota size limits how much storage the volume can allocate. When you’re done, click OK.
- Click Add, then click Done.
Before doing anything else, I needed to disable Apple’s Secure Boot to enable booting from an external hard drive.
Disclaimer 2: Altering Apple’s Secure Boot settings may allow illegitament or malicious operating systems to run on your Mac, possibly causing harm or data loss. Please see https://support.apple.com/en-us/HT208330 for more information on Apple’s Secure Boot settings on a T2 equipped Mac.
Secure Boot settings are available in Startup Security Utility:
- Turn on your Mac, then press and hold Command (⌘)-R immediately after you see the Apple logo to start up from macOS Recovery.
- When you see the macOS Utilities window, choose Utilities > Startup Security Utility from the menu bar.
- When you’re asked to authenticate, click Enter macOS Password, then choose an administrator account and enter its password.
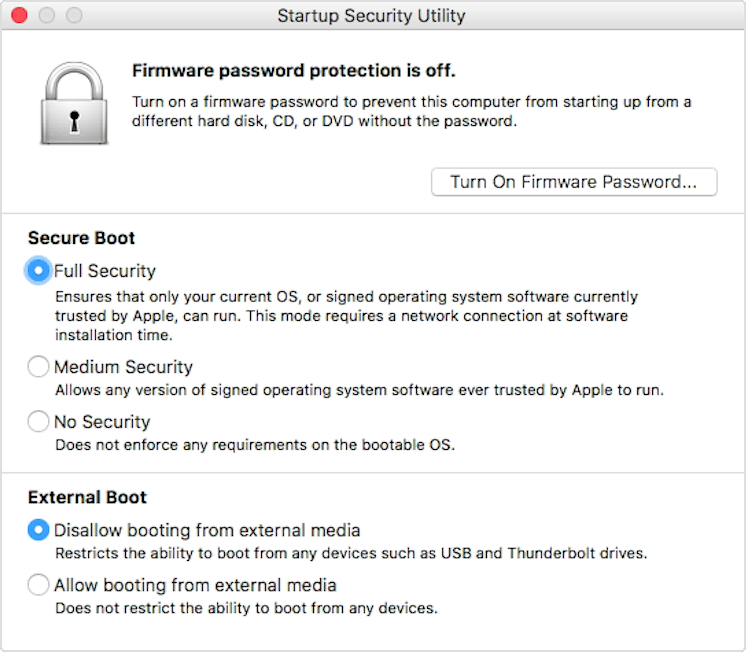
In the Startup Security Utility, make sure to select “No Security” under Secure Boot and “Allow booting from external media” under External Boot.
First, what did not work…
I originally tried simply using Carbon Copy Cloner to copy an existing High Sierra hard drive to the HighSierraTest container volume, but when I would attempt to set the container volume as the startup disk in System Preferences, I received the error “Running bless to place boot files failed.” This happened regardless of if I did tried to change the setting while in Recovery Mode, Booted in Mojave, or Booted off an external drive.
I also tried to boot off of a High Sierra USB Installer that I had previously made, which would boot up to just before the Main Option Screen (where you can select Install, Disk Utility, etc) and would prompt “Software Update is Necessary”. Clicking the update button would cause the system to attempt to update, the update would fail, and the machine would reboot to Mojave.
What did work…
I was able to boot off a USB utility drive I have that has High Sierra 10.13.6 on it. This allowed me full access to the system and a fully booted High Sierra copy without issue.
While running this experiment, I had posted a thread in the /r/macsysadmin subreddit, and number of users noted that Apple is pushing “Machine Specific” copies of the High Sierra installer when T2 equipped Macs pull from the App Store. I decided to attempt to re-download a clean High Sierra installer directly from Apple while booted off this High Sierra Utility Drive connected to the iMac Pro.
I used this link: Download MacOS High Sierra
Note: I had trouble utilizing this link when booted in Mojave, I had to be booted off the USB Utility Drive running High Sierra. However, other users on /r/macsysadmin were able to successfully download the installer while booted in Mojave directly.
The App Store to put a fresh copy of High Sierra installer in the Applications directory on the USB Utility Drive and then I simply ran that installer and pointed it to the HighSierraTest APFS container volume I had previously setup. The installer ran, and 30 minutes later I had a machine I could dual boot between High Sierra and Mojave.
I have since installed all my software via Munki and the machine has been running exceptionally for about a month without any issues of note.
In theory, this downgrade method should also work on 2016 and 2017 MacBook Pros as they originally shipped older versions of MacOS. This method will most likely not work with 2018 MacBook Pros or the 2018 Mac Mini as those machines shipped after the release of Mojave.